Common Outdoor Lighting Installation Mistakes: The Professional
The installation of exterior lighting is frequently treated as a secondary architectural task, a finishing touch applied after the primary construction and landscaping have reached maturity. This chronological placement often leads to a “retrofit” mindset, where fixtures are placed where it is convenient rather than where they are optically or mechanically optimal. Common Outdoor Lighting Installation Mistakes. In professional property management and high-end residential design, the gap between a successful nocturnal environment and a failed one is measured in millimeters—the tilt of a shroud, the depth of a burial wire, or the specific Kelvin rating of a diode.
When these systems fail, the repercussions extend beyond mere aesthetics. A poorly executed installation can compromise the security of a perimeter by creating deep pockets of shadow that trick the human eye. It can lead to persistent electrical faults that necessitate the costly excavation of established gardens. Perhaps most commonly, it results in “light trespass,” a form of pollution that disrupts the biological rhythms of local fauna and creates friction between neighbors. The complexity of a modern lighting system, particularly with the transition to sensitive LED drivers and smart-integrated controls, requires a move away from amateur guesswork toward a rigorous, systemic methodology.
Achieving a high-performance nightscape necessitates an understanding of the “Total System Lifecycle.” This includes the chemical interaction between soil acidity and copper wiring, the physics of voltage drop over long distances, and the psychological impact of contrast ratios. To look at the exterior environment through an editorial lens is to see light as a precision resource. This article serves as a comprehensive diagnostic framework, identifying the technical and strategic pitfalls that define the most prevalent failures in the industry. By dissecting these errors, we can establish a blueprint for installations that are not only visually compelling but also mechanically resilient for decades.
Common outdoor lighting installation mistakes
To address common outdoor lighting installation mistakes effectively, one must look past the superficial issue of a light not turning on. From a multi-perspective view, a mistake might be electrical (voltage drop), mechanical (moisture ingress), or optical (glare and poor aiming). The professional installer views the system as a singular, closed-loop machine where the failure of a single $5 connector can eventually degrade a $2,000 transformer.
A frequent oversimplification in DIY and low-tier professional installations is the “daisy-chain” wiring method. While it uses less wire, it creates a cascading voltage drop. The first fixture on the line receives a full 12 volts, while the last might receive only 9 volts. In the LED era, this results in color shifting—where the first light looks warm and white, but the last light appears sickly and dim. This technical nuance is a hallmark of high-end design: ensuring “Voltage Parity” across the entire site so that the nocturnal atmosphere remains cohesive.
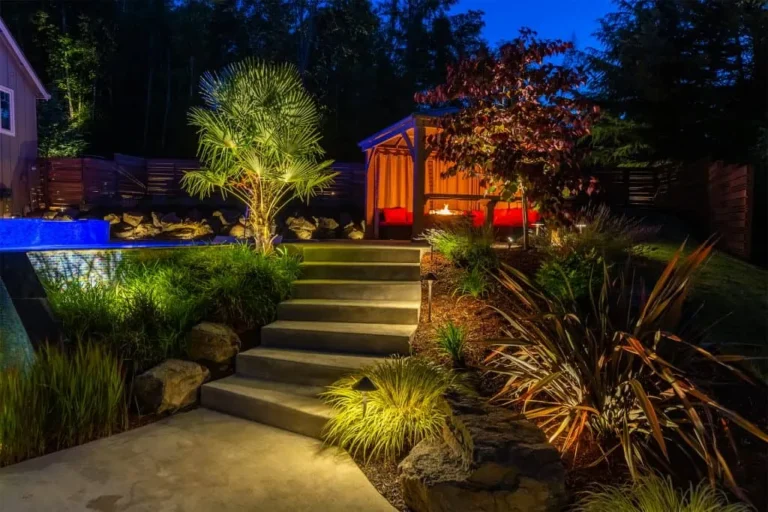
Another persistent risk involves the “Photometric Environment.” Many planners fail to account for the Reflectance Value of different surfaces. Installing a high-lumen spotlight against a light-colored stucco wall creates a “hot spot” that blinds the viewer, rendering the surrounding landscaping invisible.
The Evolution of Exterior Illumination Systems
The historical trajectory of outdoor lighting has moved from the “volume” era to the “precision” era. In the mid-20th century, the goal was sheer brightness. High-voltage (120V) systems were the standard, utilizing incandescent or halogen bulbs that pulled massive amounts of current. Because these bulbs were inefficient and generated significant heat, the fixtures had to be large and the wiring heavy-duty.
The “Low-Voltage Revolution” of the 1990s introduced the 12V transformer, which allowed for safer, more flexible installations. However, this introduced a new set of common outdoor lighting installation mistakes related to amperage limits and wire gauge selection. The subsequent “LED Revolution” in the 2010s further complicated the landscape. Today, the installer must be part electrician, part landscape architect, and part electronics technician.
Conceptual Frameworks for Diagnostic Success
1. The “Hub-and-Spoke” Topology
This mental model replaces the daisy-chain. By running a dedicated wire from the transformer to a central “hub” (a weatherproof junction box) and then radiating out to individual fixtures, the installer ensures equal voltage and simplifies troubleshooting. If one light fails, the others remain unaffected, and the point of failure is isolated.
2. The “Sightline-Avoidance” Matrix
A successful design is one where you see the effect of the light but never the source. This framework requires the installer to physically walk the property from every possible entry point—the street, the driveway, and the interior windows—to ensure that no diode is directly visible. Any visible diode is a failure of shielding.
3. The “Three-Layer” Hierarchy
Every installation should be categorized by its functional purpose:
-
Path/Safety: High-traffic areas requiring uniform, downward light.
-
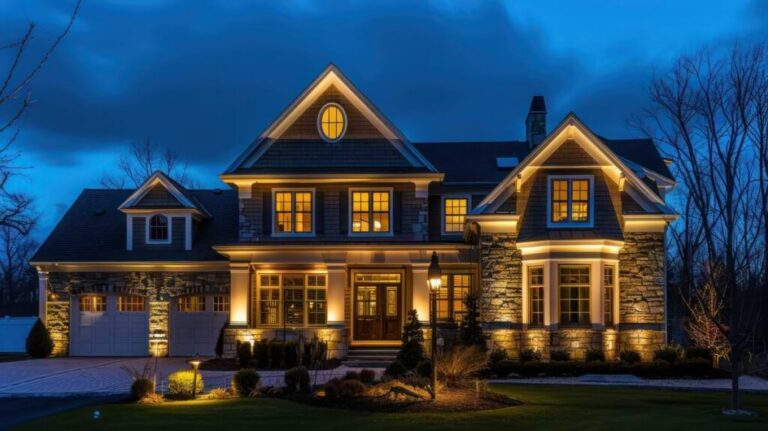
Architectural: Highlighting the “bones” of the building.
-
Ambient/Landscape: Softening the transition into the darkness.
Key Categories of Installation Failures
Analyzing failures requires a breakdown of where the system was compromised.
Technical Comparison of Connection Methods
| Method | Initial Effort | Reliability | Troubleshooting Ease | Risk of Voltage Drop |
| Daisy-Chain | Low | Low | Difficult | High |
| Hub-and-Spoke | Moderate | High | Simple | Low |
| T-Method | Moderate | Moderate | Moderate | Moderate |
| Integrated Smart Hub | High | Extreme | Digital/Instant | Negligible |
Moisture Ingress and Material Choice
The most common mechanical failure is “wicking.” If a wire connection is not truly “potted” (sealed in grease or resin), capillary action can pull water up through the copper strands and directly into the fixture’s electronics. Using cheap “piercing” connectors is a primary driver of this failure mode. Professional systems utilize heat-shrink connectors or gel-filled wire nuts that create a hermetic seal.
Detailed Real-World Scenarios and Decision Logic

Scenario 1: The “Runway” Effect
In many suburban installations, path lights are placed in a straight, equidistant line along both sides of a walkway. This is a classic mistake. It creates a visual “runway” that draws the eye toward the end of the path rather than the destination.
Scenario 2: The Tree-Girdling Trap
Installers often wrap wires tightly around tree trunks for “up-lighting.” As the tree grows, the wire is strangled, eventually causing a short or killing the limb. The professional solution is to use “stand-off” mounts and leave a loop of extra wire (a “service loop”) that allows the tree to expand for a decade without tensioning the electrical system.
Scenario 3: The “Over-Transformer” Failure
A homeowner adds five extra lights to an existing system, unaware that the transformer is already at 90% capacity. In the summer heat, the transformer overheats and the thermal fuse blows. One must always plan for “Capacity Overhead,” ensuring that the total wattage never exceeds 80% of the transformer’s rated output.
Scenario 4: The Glare Bomb
A spotlight intended for a second-story peak is angled too high, hitting a bedroom window directly. This is a failure of “Beam Angle Selection.” Using a 60-degree wide flood where a 15-degree narrow spot was required is a common error that ruins the livability of the home’s interior at night.
Planning, Cost, and Resource Dynamics
The economics of outdoor lighting are frequently misunderstood. A “cheap” installation often has a higher Total Cost of Ownership (TCO) because of the “Replacement Cycle.”
Total Cost of Ownership (10-Year Horizon)
| Component | DIY/Low-Tier System | Professional-Grade System |
| Initial Hardware | $400 | $1,500 |
| Installation Labor | $0 (DIY) | $1,200 |
| 10-Year Energy (LED) | $120 | $120 |
| Maintenance/Parts | $800 (Replace twice) | $50 (One driver) |
| Total 10-Year TCO | $1,320 | $2,870 |
While the professional system is more expensive, its value lies in “Property Resiliency.” A system that fails after three years is an 100% loss of capital. A system that lasts 20 years increases the appraisal value of the home and provides consistent security.
Tools, Strategies, and Support Systems
-
Digital Voltmeter: This is non-negotiable. One must measure the voltage at the furthest fixture under full load to ensure it falls within the LED’s operating range (usually 10V – 15V).
-
Gel-Filled Connectors: These prevent the “wicking” effect mentioned earlier.
-
Beam-Spread Templates: Using a physical or digital template to visualize how wide a light will cast before drilling into a stone wall.
-
Astronomical Timers: These use latitude and longitude to turn lights on at precisely the right sunset time, avoiding the waste of lights being on during a gray afternoon.
-
Conduit for Hardscapes: Never bury a wire directly under a concrete walkway. Always use a PVC “sleeve” to allow for future wire replacement without breaking the concrete.
-
Dimming Drivers: Not all LEDs are dimmable. A major mistake is trying to dim a non-dimmable driver, which causes flickering and premature failure.
The Risk Landscape: Compounding Failure Modes
Failures in exterior lighting are rarely isolated; they tend to compound. A common sequence begins with a “Nicked Wire.” During a routine planting, a shovel nicks the insulation of a burial wire. This is not enough to blow a fuse, but it allows soil moisture to begin corroding the copper. This corrosion increases resistance, which creates heat. The heat eventually melts the wire nut at the next fixture, which then allows water into the fixture itself, destroying the LED array.
Taxonomy of Risks:
-
The Soil Acidity Factor: In regions with high soil acidity, standard copper wire will degrade 50% faster. “Tinned” copper wire is the only sustainable choice here.
-
The Frost-Heave Mode: In northern climates, fixtures not set in a gravel base will “heave” out of the ground as the soil freezes and thaws, leading to misaligned beams and pulled connections.
-
The Wildlife Variable: Rodents are attracted to certain types of wire insulation. Using “direct-burial” rated cable that contains an anti-chew bitterant is a necessary strategy in rural environments.
Governance, Maintenance, and Long-Term Adaptation
An outdoor lighting system is not a static utility. It is an “Organic Asset” that must be managed.
The Seasonal Adjustment Checklist
-
Spring: Clean lenses of winter salt and road grime. Check for frost heave.
-
Summer: Re-aim fixtures to account for new leaf growth. Prune branches that are creating “shadow blobs” on paths.
-
Autumn: Clear leaves from the tops of fixtures to prevent heat buildup and potential fire risks.
-
Winter: Check that snow removal hasn’t crushed low-profile path lights.
Review Cycles: Every three years, a “Systemic Audit” should be performed. This involves re-testing voltage at the hubs and checking the transformer for signs of insect nesting or moisture.
Measurement, Tracking, and Evaluation Metrics
-
The “Nadir” Ratio: The measurement of light directly under a fixture vs. 5 feet away. High-performance systems aim for a ratio that minimizes “hot spots.”
-
Leading Indicator: Quarterly voltage readings. If the voltage drops by more than 0.5V over a year, it indicates a corroding connection somewhere in the system.
-
Qualitative Signal: “Visual Fatigue.” If residents find themselves squinting when entering the property, the contrast ratio is too high and glare management has failed.
-
Documentation: Every system should have an “As-Built Map.” This is a photo or drawing of the property with the exact wire runs marked. Without this, future landscaping is a “landmine” exercise.
Dismantling Industry Misconceptions
-
“Solar is a permanent solution”: Solar lights are excellent for temporary paths, but their internal batteries and plastic lenses degrade in UV light. For a “pillar” property, they are a high-maintenance distraction.
-
“I need the highest wattage for security”: Excessive brightness creates “blindness glare.” Soft, uniform light that allows the eye to see into the shadows is the only true security strategy.
-
“You can’t have too many lights”: This is a primary driver of common outdoor lighting installation mistakes. Over-lighting creates “clutter,” which obscures architectural beauty and wastes energy.
-
“Wire depth doesn’t matter for low voltage”: While 12V isn’t as dangerous, shallow wires are frequently cut by lawn aerators or edging tools. A minimum depth of 6-8 inches is the industry standard for a reason.
Ethical and Environmental Considerations
The “Ethical Night” is a concept gaining traction among urban planners. Light pollution is a “tragedy of the commons”—my unshielded light ruins your view of the Milky Way. Beyond aesthetics, the blue-light spectrum in many modern LEDs is detrimental to human melatonin production and disorients migratory birds. Avoiding installation mistakes means choosing “Warm” light (under 3000K) and utilizing “Full Cut-off” fixtures that direct 100% of the light downward. This is not just a stylistic choice; it is a commitment to the ecological health of the local environment.
Conclusion: The Resilient Nightscape
A successful installation is one that remains invisible during the day and provides a serene, safe, and sophisticated environment at night without the constant need for intervention. By systematically avoiding the common outdoor lighting installation mistakes detailed here—prioritizing voltage parity, hermetic connections, and glare suppression—a property owner can transform their exterior from a simple dark space into a high-authority asset.